
Cliona Byrne explains how to make decorations for Christmas
Sewing projects are perfect during Christmas, they can be done while sitting by the fire or watching the television.
Since I can remember I have worked on sewing projects over Christmas holidays with my mother, from angels for the top of the tree to little Christmas teddy bears. However, I now prefer simple projects which I can start and complete in one evening. The immediate gratification prevents unfinished projects and having to escape away to the sewing machine.
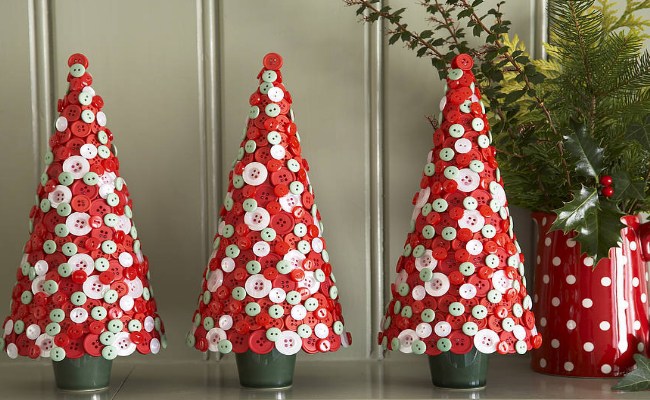
The button Christmas tree
This project is perfect for any non-sewers. This piece was inspired by an ever growing button collection that first began during my childhood. As a button hoarder, I wanted to use the buttons for a fun project that allowed me to keep the buttons for future craft projects. The tree can be used as a centre piece or small individual ones can be made for place names during Christmas dinner parties.
Instructions
Step 1: Take the green card and wrap it into a cone shape. If the card is not very thick, use two sheets. Keep in place with Cellotape.
Step 2: Trim the base until the bottom of the cone is level and able to stand upright.
Step 3: I used pins for this project so I could reused the buttons, alternatively glue can be used. This technique makes the project suitable project for children.
Step 4: Before attaching the buttons, place any ribbons that you may want in the background, I used a Christmas ribbon and two zips. Wrap the ribbon around the cone and attach the ends with pins or glue.
Step 5: Next begin by attaching the buttons to the tree. If using pins use ones with a bobble end, they add decoration and won’t slip through the button holes. Begin by placing large green buttons evenly around the cone. Simply push the pin through a button whole and into the card. Take care of fingers from the pins inside the cone.
Step 6: Continue to add layers of buttons and other chosen decorative pieces.
Step 7: If using glue, begin from the bottom but allow each layer to dry before adding more layers, otherwise the buttons will begin to slip off.
Step 8: To top the tree I made a simple star by bunching a small piece of golden fabric into a rose shape, placing a few stitches in the centre and adding a button. Alternatively a large golden button can be placed on top.
Materials required:
Green card
Buttons
Ribbons
Golden Fabric
Pins/glue
Cellotape
Paper scissors
Sewers alternative for a fabric tree
Instructions
As an alternative for sewers, simple draw a triangle shape on paper as a pattern. Use the pattern to cut out two fabric triangles. Draw a circle on paper for the trees base, make sure that the diameter of the circle matches the base length of the triangle. Use the pattern piece to cut out one circle. Sew the two triangles together by hand or machine, turn inside out and stuff using an old cushion or pillow. To attach the base of the tree, use a blanket stitch to attach the bottom to the tree. Then simply sew the ribbons and buttons into the fabric tree.
Materials required:
Paper
Paper scissors
Green Felt
Sewing scissors
Sewing needle
Thread
Felt owl decoration
Instructions
Step 1: Draw the owl onto a piece of card, trace the individual pieces. Cut out these pieces which will be used as the pattern.
Step 2: Pin the card to the felt. Cut out around the pattern pieces. Cut out two of everything and just one of the beak. Make sure not to leave any jagged edges.
Step 3: Begin by pinning down one of the wings to the body of the owl.
Step 4: Using the embroidery thread, do a simple running stitch on the inside of the wing. Repeat this step on the other wing.
Step 5: Pin down the beak and place a few simple sticks at the head and bottom of the piece. Alternatively, do a simple running stitch the whole way around.
Step 6: Next pin down the eyes and place a few stitches to resemble eyelashes. Buttons can be used either.
Step 7: Take a ribbon of desired length, double it over and use a cross stitch to attach the ribbon to the inside of the owl’s back.
Step 8: Pin the back and front of the owl together. Use a blanket stitch to attach the two sides together.
Step 9: Before completely sewing around the owl, leave a one inch gap and stuff. Use an old unwanted pillow or cushion and add little bits of stuffing, a little at a time until the owl is nicely plump.
Step 10: Complete the blanket stitch around the owl and it is ready to be placed on the Christmas tree.
Materials required:
A selection of different coloured felts
Card
Embroidery sewing needle
Pins
Embroidery thread
Ribbon
Stuffing
Sewing scissors