
 Chai Brady
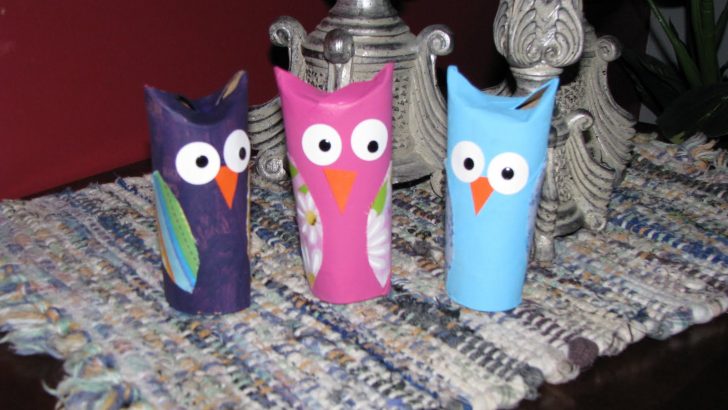
Children’s Corner
Get your children off the couch and away from the TV so they can focus on something much more fun and creative. Making toilet-paper-roll owls is easy and is a great way to make use of something you would otherwise have thrown out.
These colourful creations can be kept to decorate anywhere around the house, perhaps perched on a windowsill, overlooking a playroom or even in bedrooms.
What you’ll need to create your owl is toilet-paper rolls, scrap paper, glitter card stock (or plain card brushed with glue with glitter added), foam sheets (preferably with an adhesive back, but if not, use glue to attach), craft glue, scissors and a pencil.
Begin by drawing a half oval at the top of the paper roll, you can use a cookie cutter as a stencil if you wish. Cut the circle out and use it as a template to cut an identical one from the other side of the paper roll too.
Keep the half-moon pieces you’ve cut out of either side of the top of your toilet paper roll, as you’ll be needing them for the owl’s wings.
Scrap paper
Place two fingers inside the paper roll and cover the outside in glue. Roll the paper roll onto your colourful scrap paper so that it creates a nice outside layer, then you can trim any excess bits of paper so that the scrap paper first on the outside of the roll perfectly.
Set this aside to dry for a bit. Then cover one side of the two half-moon pieces you cut off the paper (which will be the wings) and roll in glue and place onto the back of the glitter card stock. Set them aside to dry.
Next, you can cut circles out of white and black foam to make eyes, alternatively you could make the eyes any colour you want if you don’t have white and black foam! Cut one big circle to make the eye and one small circle which will be the pupil (make sure not to make the circles too big as they need to fit on the toilet paper roll).
Cut out a small beak from yellow glitter card stock. Attach the eyes, beak, and wings using glue where needed.
Set them aside to dry, and you are done! These special creations can be a reminder of a great time with your child and just how artistic they can be.